The Project Export screen allows Project Administrators to create, manage, and execute project export templates. These templates are established to export project contents including groups, users, permissions, roles, metadata, incoming email and attachments, discussion boards, markups and file versions. This feature is useful for exporting an entire project or specific elements of a project to a permanent archive system, on or off the ProjectDox server. Things to be aware of include:
An exported project can only be imported into a ProjectDox site that is the same primary version
A common purpose of export is to archive the contents of the project after approval.
Another common purpose of the export is to develop the project in the customer test environment and import the final result into production as a project template.
A zipped file is not eligible for import into another system, the file must be unzipped.
Project and System Administrators have access to export project content with or without using an export template.
![]() eForms and workflows are not included in a project
export.
eForms and workflows are not included in a project
export.
From the Export tab of a project, click the Add New button.
The Advanced tab will display for configuration.
In Template Name, type the name of the template.
In the Include in Export section, select the desired criteria:
a. Groups – All groups in the Groups tab (notification designations for the users and groups are included).
b. Users – Include users from the Groups and Permissions tabs.
SAs within the project are exported as PAs for security purposes.
Owner designation in the permissions tab is exported.
c. Permissions – All permissions for groups and users.
d. Roles – All roles in the Roles tab.
e. Metadata – All file metadata for each exported file.
f. Incoming email and attachments – All incoming email and attachments for the project.
g. Discussion Board – All project-level discussions as well as those for any selected files.
h. All Versions – select this checkbox to include all versions of the selected files. This is an “include all or none” feature; you cannot specify only certain versions.
Input a destination folder for the export or, based on the template selection, the defined destination location will display. The destination is not a local drive, the standard is a location on the web server.
a. Destination Folder – This is the location where the files and data are exported to on the network. The path can be file system (E:\ProjectExport) or a file share (\\servername\sharename). The ProjectDox PD_USR account must have appropriate permissions for the destination folder.
Select the output format.
a. You can choose one or both of these options:
Select Direct File System to export the files to the defined file system location to allow easy access by users or other applications to the exported information. The folder name will appear as project name | date | time.
Select Zip File to compress the folder and file structure into a single zip file to the defined file system location (Destination Folder). The zip file name will appear as project name | date | time.
Click Save Template to save the configured settings into an export template for future use and selection from the Select Template dropdown.
An administrator can edit a template or temporarily alter its existing settings on an existing Export to export a project without saving the changes.
From the Export tab, select the Advanced tab.
Select the desired template from the Select Template dropdown. The screen will refresh to display the current export template values.
Make the desired updates and click the Save Template button to save the changes.

Project exports are performed using export templates or by selecting values from the Advanced tab. The result of the export to the file system allows the files and associated data to be imported into a document management system. Avolve Professional Services can customize the output for your particular document management system.
ProjectDox now offers an import tool (available only to System Administrators) that allows a previously exported project to be imported. The import results are based on the data exported from the project.
To export project contents (groups, users, permissions, roles, metadata, files, incoming emails, and markups), a user must access the Export tab of the specific project they wish to export. Two tabs are available for exporting:
Basic tab
The Basic tab is enabled when at least one export template has been created. This tab is a shortcut, allowing the administrator to select the desired folder(s) for export and then apply a previously defined template to the export.
To use the Basic tab:
From the Select Template dropdown, select the template to apply.
From the Select Export Folders section, select the check boxes for the folder(s) to Export. This view shows all the folders of the current project.

Click the Export button.
A message will display, indicating an email will be sent to the user to notify them when the export has been completed. Click OK to complete the export.
A message will display, indicating an email will be sent to the user to notify them when the export has been completed. Click OK.

Settings from the Approved Export template (see below) are applied to the selected folder(s).

Advanced tab
The advanced tab is used for configuration and management of export templates. It also provides the administrator flexibility to temporarily alter an existing template for the current export, or perform the export without the use of a template.
To export without using a template:
From the Export\Advanced tab select Export All Project Folders, or select the specific folder(s) to export from the Select Export Folders section.
![]() Selecting Export
All Project Folders will select all folders, whether they
contain files. Exporting a folder will export its files whether
the folder is selected individually or as part of “Export all
project folders.”
Selecting Export
All Project Folders will select all folders, whether they
contain files. Exporting a folder will export its files whether
the folder is selected individually or as part of “Export all
project folders.”
Leave the template name blank.
Select the desired objects from the Include in Export section:
a. Groups
b. Users
c. Permissions
d. Roles
e. Metadata
f. Discussions
g. Markups
h. All versions
Enter a destination folder (see previous requirements).
Select the output format.
Click the Export button.
Click OK to the pop-up message to initiate the export.
An email will be sent to you with the results of the export process. If the export fails, the error will be included in the email. If the export succeeds, the email will contain the pertinent information.

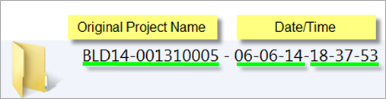
When the system exports a project, it applies the following naming convention to the resulting folder/zip: project name – date – time.
The results in the PdoxTemp folder must be retrieved by an admin with access to the web server.

![]() Save the email message from a successful project
export. Should an import be needed in the future, the path information
can easily be copied from the export email.
Save the email message from a successful project
export. Should an import be needed in the future, the path information
can easily be copied from the export email.
![]()