The Systemconfig.aspx page contains very powerful options that affect the entire site. It is reserved for a user with the role of System Administration (SA). It is critical that any updates made to this page be done with a full understanding of the impact. Consult Avolve Support prior to making any changes.
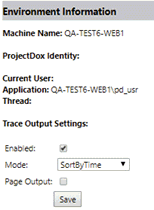
You may be asked to enable Trace by Avolve Technical Support. When turned on, verbose error logging is executed and aids in identifying the cause of a problem.
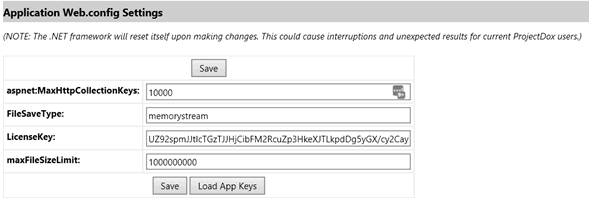
The ProjectDox license can be reviewed and/or updated from this page if necessary or required:
aspnet:maxHttpCollectionKeys – required by ASP.NET
FileSaveType – Infragistics uploader
LicenseKey – License key associated with software
maxFileSizeLimit – Infragistics uploader
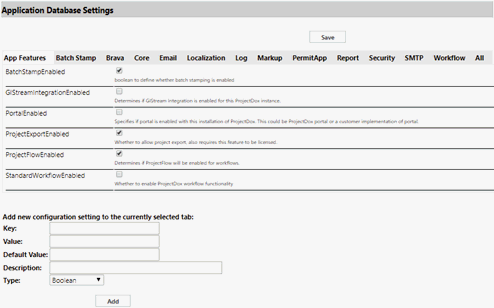
This section is identical to the screens available in the previous section (Site Configuration) and can be accessed and modified through this page at any time. The “add new configuration setting” section is useful for integrators to define specific values they require.
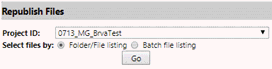
The Republish Files section allows you to republish any files that do not publish correctly the first time the file is uploaded to a ProjectDox project. Select a project ID from the available names in the dropdown list and then select either folder/file listing, to select individual files, or batch file listing, to select a group of files.
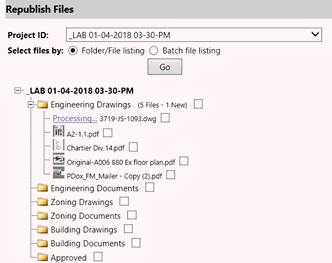

When file/folder listing is selected, you may select individual files or folders and select whether to include all file versions and/or sub-folders of any selected parent folders. Click Republish Selected to republish any listed files back to the selected project.
When viewing by Batch file listing, the current success status of each published file is listed in the right column. Any files failing to publish, display a red NO in this column. You may select these files and click the Republish Selected button at the bottom of the listings.
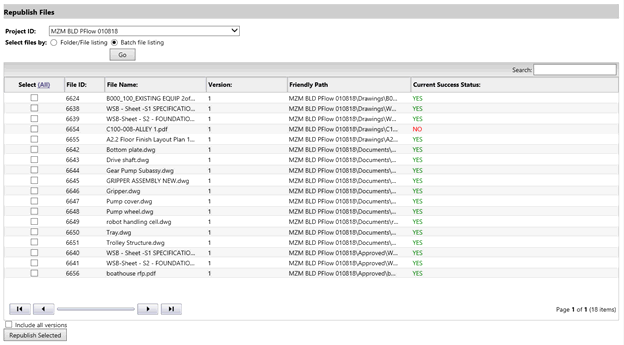
Be sure to examine all available pages for failed status by clicking the next page buttons (if multiple pages exist).
The ProjectDox Utility and the systemconfig.aspx republish options are not related or dependent on each other. The systemconfig.aspx has no timeout, dead considerations, or max retry restrictions.
<add key="SecondsBetweenInvoke" value="300"/> <!-- how many seconds between when web services/processing are invoked, recommended is 300 - 600 seconds (5 - 10 minutes) -->
<add key="RepublishMaxRetryCount" value="2"/> <!-- Maximum # of times to attempt to republish a file. This service will try to republish the files every time the service executes based on the [SecondsBetweenInvoke] setting in this config file. If the file hasn't been attempted to be republished the first time before [SecondsBetweenInvoke] comes again then it won't immediately try to republish the file. Instead, it will wait until the file fails the second time and then republish again [RepublishMaxRetryCount] times. -->
<add key="TicketConsideredDeadMinutes" value="240"/> <!-- Maximum # of minutes before a ticket is considered dead. This is required in the case where the Job Processor fails to notify ProjectDox of success/failure of the publishing (i.e. Job Processor critical error, network problems, ProjectDox down, etc) . The minute count is measured from when the ticket was originally submitted. For example, if you submit 10 files for publishing then the Job Processor server takes those 10 tickets into memory to publish the files. If the Job Processor server dies while processing the 10 tickets without being able to ping ProjectDox on the file publish status, then after [TicketConsideredDeadMinutes] minutes it will resubmit those tickets for publishing. -->
The JPQueueTicket database record is always created when a file is uploaded with the JPSuccess column as 0 until the Success Notification is received which changes the value to 1.
Files that are stuck in “Processing” are in the JPQueueTicket table and will continue to show JPSuccess column as 0. After 240 minutes the file will timeout. The next time the Utility runs, there will be an attempt to publish. It will continue the attempts per the RepublishMaxRetryCount value in the Utility.
Once the PublishAttemptCount column equals the RepublishMaxRetryCount, no other action will be taken.
If the file completes with an error, it no longer shows “Publishing” in the user interface, then the error is written to the PublishResult column of the JPQueueTicket table.
o Example: Primary error: publish_error, Error # 0: Unrecognized output format: .dwf, Error # 1: DWF output format is no longer supported.
Failures to publish will have a single file, a Heartbeat.txt file, in UserFilesPublish folder with details of the failure.
In some instances, in the case of a bad license, the SecondsBetweenInvoke at 300 seconds, (5 minutes) for 2 RepublishMaxRetryCount may not be enough time to resolve the problem and the attempts will hit the max.
o You can take advantage of the systemconfig page in this scenario.
o Or, you can increase the RepublishMaxRetryCount by 1 and restart the Utility.
When a file is republished via the Utility or the systemconfig page, the process updates the existing JPQueueTicket, it does not create another JPQueueTicket or record in the shared queue folder.
If you select 1 file to republish from the systemconfig page, the code retrieves up to 500 files that are ready for publishing and sends them all to the Job Processor, it is generic method that is called.
HTML publishing failure, it is not part of the republishing tool or the ProjectDox Utility.
o ActiveX must successfully publish first in order to publish the HTML
o The HTML rendition will republish only when the HTML file is clicked on
This will add and change multiple configuration settings in ProjectDox including Review checklist data, projects, project templates, roles, permissions, eforms, workflow definitions. This option is normally utilized when the system is first installed and allows the Services team to create a fully operational package as a base for customizations. It’s fully documented in Installing ProjectDox Using Enterprise Manager. The understanding and handling of the Review Configuration for a workflow should be understood prior to generating a new or updating an existing workflow.

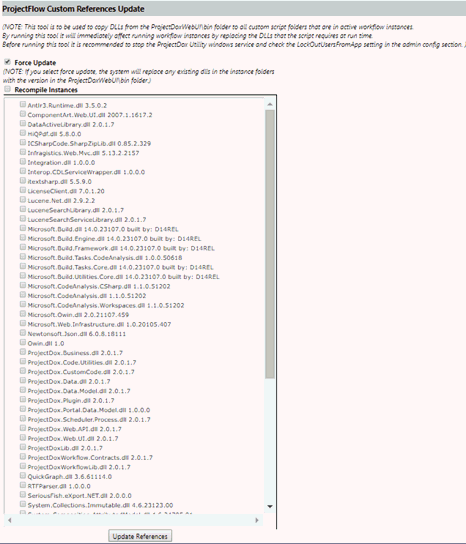
This tool is to be used to copy DLLs from the ProjectDoxWebUI\bin folder to all custom script folders that are in active workflow instances. By running this tool, it will immediately affect running workflow instances by replacing the DLLs that the script requires at run time. Before running this tool, it is recommended to stop the ProjectDox Utility windows service and check the LockOutUsersFromApp setting in the admin config section.
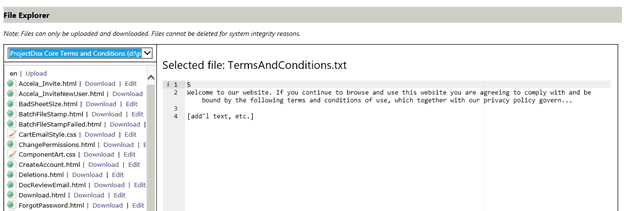
Files can only be uploaded and downloaded. Files cannot be deleted for system integrity reasons.
![]()