To create, modify, and save Batch Stamp templates, use the Advanced tab of the Batch Stamp Options panel, as shown below.
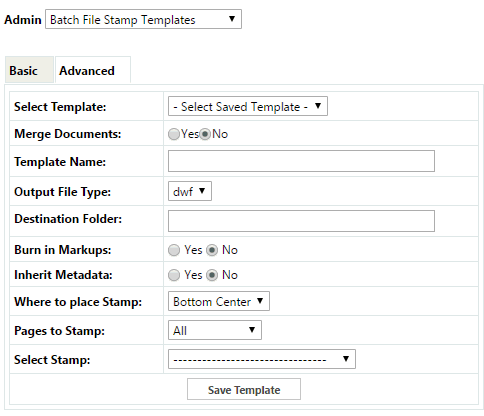
In the Template Name field, type in a template name.
Select whether to Merge Documents. There is limited file size functionality for this feature.
If Yes is selected, the Template Name field will display and should be populated with the merged document file name.
In the Output File Type field, select which format to use as your output format for all selected files. Available choices include PDF, TIFF, or DWF.
In the Destination Folder area, select the check box for the directory where you want the published output files placed, or type a valid destination directory.
Select whether to Burn in Markups. Once burned in, markups cannot be removed from the published rendition of the file.
In the Inherit Metadata area, select whether to apply the metadata from the originating file and apply to all output files of the batch. In some cases the approved files are programmatically placed in a document management system and the metadata acts as a way to categorize the files.
In the Where to place Stamp field, select an area of the document from the dropdown menu. The selected stamp will be published on all output files in the page location specified.
In the Pages to Stamp area, select which pages of the document to stamp from the dropdown menu. Available options are:
All
First
First and Last
Last
10. In the Select Stamp area, you can optionally select from the dropdown menu a markup stamp or raster stamp to apply to all of your processed documents. Stamps can contain dynamic text (table of tokens that can be used in these text strings is listed below).
11. After selecting the desired options, click Save Template to save your options as a new template that will become available in the Select Templates dropdown list for future batch processing.
12. When you are ready to process the batch with the specified options, click Process Batch. A rendition of the files will be created in the specified output format and appear in the chosen output directory. A link to the output directory appears in place of the batch options screens allowing you to quickly navigate to that folder and view the output files.
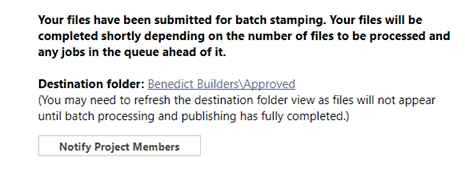
13. Optional. Click Notify Project Members and the Team Mail window will appear, allowing you to send an email notification to selected users and groups. The users and groups will only be able to view the file if they have permissions to the destination folder. If they do not have permission, the email serves as notification that the process is complete.
![]()