1. To create, modify, and save templates, select the Batch File Stamp Templates option from the System Administration dropdown of the Admin screen and click the Advanced tab. This screen allows Administrators to create and modify batch templates without having to be in a project.
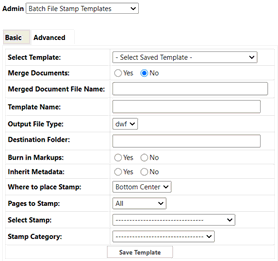
2. From the Select Template dropdown, choose a saved template to use or type in a template name to begin a new template.
3. Select whether to Merge Documents. There is limited file size functionality for this feature.
4. If Yes is selected, the Template Name field will display and should be populated with the merged document file name.
5. In the Output File Type field, select which format to use as your output format for all selected files. Available choices include PDF, TIFF, or DWF.
6. In the Destination Folder area, select the checkbox for the directory where you would like the published output files to be placed or enter a valid output directory.
7. In the Burn in Markups area, select whether to permanently overlay any existing markups on the selected files. Once burned in, markups cannot be removed from the published rendition of the file.
8. In the Inherit Metadata area, select whether to inherit metadata from the originating file and apply to all output files of the batch.
9. In the Where to place Stamp field, select an area of the document from the dropdown. The selected stamp will be published on all output files in the page location specified.
![]() A stamp will be the same
size whether applied to an 8x11 or a large drawing. You may need to
create one stamp for specification type documents and another specific
to plan size documents.
A stamp will be the same
size whether applied to an 8x11 or a large drawing. You may need to
create one stamp for specification type documents and another specific
to plan size documents.
10. In the Pages to Stamp area, select which pages of the document to place a stamp. Available choices are First, Last, First and Last, or All.
11. In the Select Stamp area, you can optionally apply a markup stamp to all processed documents. The stamps listed in this dropdown have been created by a System Administrator using the Brava Viewer's Stamp Template tool. Stamps can contain dynamic text (see Dynamic Stamp Tokens below).
12. In the Stamp Category field, you can optionally apply a stamp category to all processed documents. The categories listed in this dropdown have been created by a System Administrator.
13. When desired options have been selected, click Save Template to save your options as a new template that will become available in the Select Template dropdown list for future batch processing.
14. When you are ready to process the batch with the specified options, click Process Batch. A rendition of the files will be created in the specified output format and placed in the chosen output directory. A link to that output directory appears in place of the batch options screen, allowing you to quickly navigate to that folder and view the output files. Note that the files may need some time to process and may not be immediately available for viewing.
![]()